Differenze tra le versioni di "Project configuration steps - Introduction"
(Etichetta: visualeditor) |
|||
| (4 versioni intermedie di uno stesso utente non sono mostrate) | |||
| Riga 1: | Riga 1: | ||
| − | Functionalities to manage ''[[glossary|projects]]'' are mainly grouped in '''''Projects''''' menu. From there it is possible to access or create ''[[glossary|projects]]''. | + | Functionalities to manage ''[[glossary|projects]]'' are mainly grouped in '''''Projects''''' menu. From there it is possible to access or create ''[[glossary|projects]]''. However, ''[[glossary|projects]]'' may use ''[[glossary|company]]'' level but also specific master data which shall be configured before starting to setup specific ''[[glossary|projects]]''. For more information about ''[[glossary|company]]'' master data see the [[ItmSUITE® - Introduction to basic configuration#Company creation|company preparation]] page. |
The ''[[glossary|project]]'' information to be managed are organized in thematic areas (corresponding to tabulators) as shown in the following image. | The ''[[glossary|project]]'' information to be managed are organized in thematic areas (corresponding to tabulators) as shown in the following image. | ||
| Riga 37: | Riga 37: | ||
* [[Project configuration steps - Master data|Master data]] | * [[Project configuration steps - Master data|Master data]] | ||
| + | * [[Project configuration steps - Basic information|Basic information]] | ||
* [[Project configuration steps - Products|Products]] | * [[Project configuration steps - Products|Products]] | ||
* [[Project configuration steps - Resources|Resources]] | * [[Project configuration steps - Resources|Resources]] | ||
* [[Project configuration steps - Activity plan|Activity plan]] | * [[Project configuration steps - Activity plan|Activity plan]] | ||
| − | * [[Project configuration steps - Estimation| | + | * [[Project configuration steps - Estimation|Estimation]] |
* [[Project configuration steps - Control|Control plan]] | * [[Project configuration steps - Control|Control plan]] | ||
* [[Project configuration steps - Others|Others]] | * [[Project configuration steps - Others|Others]] | ||
| − | Each step is explained in the | + | Each step is explained in the corresponding linked section. |
Versione attuale delle 22:10, 24 gen 2016
Functionalities to manage projects are mainly grouped in Projects menu. From there it is possible to access or create projects. However, projects may use company level but also specific master data which shall be configured before starting to setup specific projects. For more information about company master data see the company preparation page.
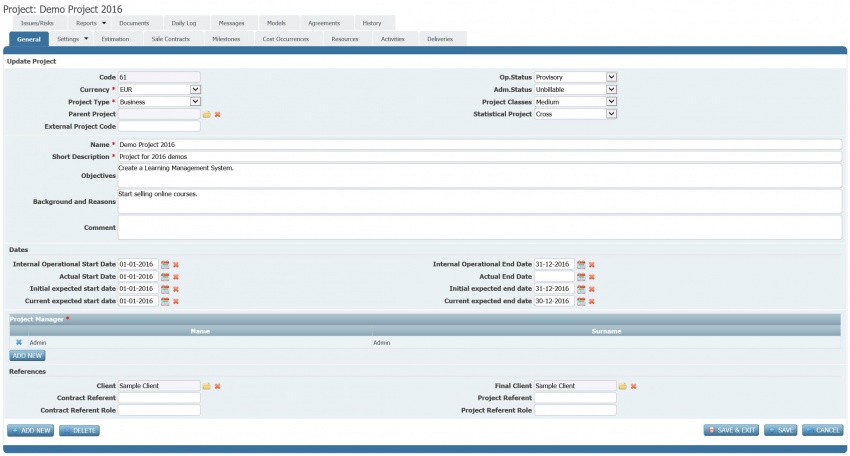
The project information to be managed are organized in thematic areas (corresponding to tabulators) as shown in the following image.
As usual, mandatory information are highlighted with a red asterisk. These are mandatory to save a project however some other may be mandatory to change the status (Op. Status) of the project. The following table summarizes the mandatory information for specific operational statuses (Op. Status) and administrative statuses (Adm. Status).
| Operational status | Mandatory information |
|---|---|
| "Provisory" | All the fields marked with a red asterisk in General. |
| "Active" | This status requires the same mandatory information of the "Provisory" status. Additionally it requires at least one resource to be added to the project (in Resources). |
| "Suspended" | This status has no additional requirements other than those of the source status. |
| "Completed" | This status has no additional requirements other than those of the source status. |
| Administrative status | Mandatory information |
|---|---|
| "Unbillable" | No requirements. |
| "Billable" | This status requires the operational status (Op. Status) to be "Active". |
| "Closed" | This status require the operational status (Op. Status) to be "Completed". |
There are no mandatory paths in order to add or update information to a project apart from respecting the editing of mandatory information (see before). However the suggested steps are the following:
Each step is explained in the corresponding linked section.
