Differenze tra le versioni di "REP - Reporting"
(→Add report on itmSUITE® menu) |
|||
| (31 versioni intermedie di uno stesso utente non sono mostrate) | |||
| Riga 1: | Riga 1: | ||
REP is an optional itmSUITE® module that defines functionality to manage and excute reports created by Eclipse BIRT Designer tool.<br/> | REP is an optional itmSUITE® module that defines functionality to manage and excute reports created by Eclipse BIRT Designer tool.<br/> | ||
It allows to load one or more report templates (BIRT.rptdesign file) and to create and to execute report instances through the BIRT Viewer integrated on itmSUITE®. | It allows to load one or more report templates (BIRT.rptdesign file) and to create and to execute report instances through the BIRT Viewer integrated on itmSUITE®. | ||
| + | |||
=== BIRT Architecture === | === BIRT Architecture === | ||
| − | BIRT (Business Intelligence Reporting Tool)is an open source tool installed as Eclipse IDE plug-in for report developing. It has origin from collaboration between Actuate (along with IBM) and Eclipse.org open source community.<br/> | + | [http://www.eclipse.org/birt/ BIRT] (Business Intelligence Reporting Tool) is an open source tool installed as Eclipse IDE plug-in for report developing. It has origin from collaboration between Actuate (along with IBM) and Eclipse.org open source community.<br/> |
BIRT is a Java based tool that allows to extract data from many data source types for report generation in several output format (pdf, xlsx, docx, etc.). | BIRT is a Java based tool that allows to extract data from many data source types for report generation in several output format (pdf, xlsx, docx, etc.). | ||
| Riga 12: | Riga 13: | ||
# Report Engine: runtime component for report rendering | # Report Engine: runtime component for report rendering | ||
| − | The Design Engine generates a .rptdesign file(in XML format) structured according to configurations applied by user (by BIRT Designer) and the Report Engine, through BIRT Viewer, | + | The Design Engine generates a .rptdesign file (in XML format) structured according to configurations applied by user (by BIRT Designer) and the Report Engine, through BIRT Viewer, parse and renders it as report in HTML,or other, format. |
| + | |||
| + | === BIRT Report on itmSUITE® === | ||
| + | In itmSUITE®, the steps required to upload and execute BIRT report previously created through the BIRT Designer are following: | ||
| + | #Data source configuration | ||
| + | #Load report template (.rptdesign file) | ||
| + | #Create a report instance | ||
| + | #Add report on menu and execute it | ||
| + | |||
| − | + | ==== Data Source Configuration ==== | |
| − | === | + | In itmSUITE®, BIRT report data can be extracted only from data sources connected to database. |
| − | + | Data Source settings are accessible on the '''''General > Company > Report Engine > Data Source''''' menu. | |
| − | |||
| + | [[File:dataSource.png|centre|frame|Data Source list - more data source items can be created]] | ||
| + | |||
| + | Data source creation steps: | ||
| + | # Click on '''Add New''' button | ||
| + | # Fill following fields (* mandatory): | ||
{| class="wikitable" | {| class="wikitable" | ||
| − | ! | + | ! Field Name !! Description !! Example Value |
|- | |- | ||
| − | |<u> | + | | <u>Name</u>* || Logic data source item name || "Sample DB" |
|- | |- | ||
| − | |<u> | + | | <u>Description</u> || Data source item description || "Sample data source" |
|- | |- | ||
| − | |<u> | + | | <u>Company</u>* || Company to which data source item is assigned || "Sample Company" |
|- | |- | ||
| − | |<u> | + | | <u>Status</u>* || Configurable Active/Inactive statuses || "Active" |
|- | |- | ||
| − | |<u> | + | | <u>Type</u>* || Driver type used to connect to data source || "JDBC" |
|- | |- | ||
| − | |<u> | + | | <u>Data Driver</u>* || Driver used to connect to data source || "MSSQL" |
| + | |- | ||
| + | | <u>DB Server</u>* || URL (or IP) of data source server || "192.168.10.5" | ||
| + | |- | ||
| + | | <u>Port</u>* || Connection data source port || "1433" | ||
| + | |- | ||
| + | | <u>DB Name</u>* || Database name to which data source item refers || "PMSM_SAMPLE_DB" | ||
| + | |- | ||
| + | | <u>Username</u>* || Username used to connect to database || - | ||
| + | |- | ||
| + | | <u>Password</u>* || Password used to connect to database || - | ||
|- | |- | ||
| − | |||
|} | |} | ||
| + | <ol> | ||
| + | <li value=3>Click on '''Check And Save''' button to check database connection and to save data source settings</li> | ||
| + | </ol> | ||
| − | ==== | + | ==== Load report template ==== |
| − | + | Report template (.rptdesign) file defines the report structure in a well-formed XML document. | |
| − | + | In itmSUITE®, a report template can be associated to more report instances. Report template configuration is accessible on the '''''General > Company > Report Engine > Report template''''' menu. | |
| − | |||
| − | |||
| − | |||
| − | + | [[File:reportTemplateList.png|centre|frame]] | |
| − | |||
| + | The report template creation requires following steps: | ||
| + | # Click on '''Add New''' button | ||
| + | # Fill following fields on ''General'' tab: | ||
{| class="wikitable" | {| class="wikitable" | ||
| − | ! | + | ! Field Name !! Description !! Example Value |
| + | |- | ||
| + | | <u>Name</u>* || Logic report template name || "Sample Report Template" | ||
|- | |- | ||
| − | | | + | | <u>Description</u> || Report template description || "A report tamplate as sample" |
|- | |- | ||
| − | | | + | | <u>Status</u>* || Configurable Active/Inactive statuses || "Active" |
|- | |- | ||
| − | | | + | | <u>BIRT Report Template</u>* || Load .rptdesign file || "Sample_Report_Template" |
|- | |- | ||
|} | |} | ||
| − | + | <ol> | |
| − | = | + | <li value=3>Fill the following fields on ''Data source'' tab:</li> |
| − | + | </ol> | |
| − | |||
{| class="wikitable" | {| class="wikitable" | ||
| − | ! | + | ! Field Name !! Description !! Example Value |
|- | |- | ||
| − | |<u> | + | | <u>Data source</u>* || Data source imported from .rptdesign file || "PMSM_DB_TEST" |
| − | |||
| − | |||
| − | |||
|- | |- | ||
| − | |<u> | + | | <u>Mapped on</u> || itmSUITE® data source item to which report template can refers for data extraction. If it is empty, data source defined in .rptdesign file is used || "PMSM DB Test" |
| − | + | |- | |
| − | * | + | | <u>Type</u>* || Connection type to data source (always JDBC) || "JDBC" |
| − | |||
| − | |||
| − | |||
|- | |- | ||
|} | |} | ||
| − | = | + | <ol> |
| − | + | <li value=4>Click on '''Save''' button to save report template settings</li> | |
| + | </ol> | ||
| − | |||
| − | |||
| − | |||
| − | |||
| − | |||
| − | |||
| − | |||
| − | |||
| − | |||
| − | |||
| − | |||
| − | |||
| − | |||
| − | |||
| − | |||
| − | |||
| − | |||
| − | |||
| + | ==== Create Report Instance ==== | ||
| + | Report instance defines a BIRT report that can refer to only a report template and can be launched directly from itmSUITE® menu. | ||
| + | A report instance is configurable on the '''''General > Company > Report Engine > Report Management''''' menu | ||
| − | + | [[File:reportManagementList.png|centre|frame]] | |
| − | |||
| + | The report instance creation requires following steps: | ||
| + | # Click on '''Add New''' button | ||
| + | # Fill following fields on ''General'' tab: | ||
{| class="wikitable" | {| class="wikitable" | ||
| − | ! | + | ! Field Name !! Description !! Example Value |
| + | |- | ||
| + | | <u>Name</u>* || Report name || "Sample Report" | ||
| + | |- | ||
| + | | <u>Description</u> || Report description || "A sample report" | ||
|- | |- | ||
| − | |<u> | + | | <u>Status</u>* || Configurable Active/Inactive statuses. If Inactive report cannot be shown on itmSUITE® menu || "Active" |
| − | |||
| − | |||
| − | |||
|- | |- | ||
| − | |<u> | + | | <u>Template</u>* || Report template name to which report instance refers || "Sample_Report_Template" |
| − | |||
| − | |||
| − | |||
| − | |||
| − | |||
| − | |||
|- | |- | ||
|} | |} | ||
| + | <ol> | ||
| + | <li ''value=3>Check that all report parameters are visible on ''Parameters'' tab:</li> | ||
| + | </ol> | ||
| + | |||
| + | [[File:reportParameter.png|centre|frame]] | ||
| + | |||
| + | <ol> | ||
| + | <li value=4>On ''Filter Designer'' tab, it is possible to customize a report launcher box (at default it contains the same parameters defined on report template):</li> | ||
| + | *Hide/show report parameters | ||
| + | *Add/delete parameters sections | ||
| + | *Edit each report parameter item (read-only,label editing, mandatory, etc.) | ||
| + | *Add (as drag&drop ) <u>Output</u> field to extract report in several format (html, word, excel, pdf, ppt) | ||
| + | *Add (as drag&drop) <u>Open Report in New Window</u> check box to visualize report ouput on a new tab | ||
| + | |||
| + | [[File:reportDesigner.png|centre|frame]] | ||
| + | |||
| + | It is possible to see a report launcher preview by clicking on '''Preview''' button | ||
| + | <li>On ''Assignments'' tab, set report visibility grants on itmSUITE® menu | ||
| − | + | [[File:reportAssignment.png|centre|frame]] | |
| + | |||
| + | by following filter fields: | ||
{| class="wikitable" | {| class="wikitable" | ||
| − | ! | + | ! Filter Name !! Description |
|- | |- | ||
| − | + | | <u>Role</u> || it limits visibility to users that belong to following roles: ''superadmin'', ''administrator'', ''manager'', ''pm'', ''resource'', ''requester''. It works also as prefilter for <u>Resource</u> filter | |
| − | |< | ||
| − | |||
| − | |||
| − | </ | ||
| − | | | ||
|- | |- | ||
| − | + | | <u>Resource</u> || it limits visibility to selected ''resources'' | |
| − | |< | ||
| − | |||
| − | |||
| − | </ | ||
| − | | | ||
|- | |- | ||
| − | + | | <u>Group</u> || it limits visibility to members of selected ''groups'' | |
| − | |< | ||
| − | |||
| − | |||
| − | </ | ||
| − | | | ||
|- | |- | ||
| − | + | | <u>Organization unit</u> || it limits visibility to ''resources'' that belong to selected ''organization units'' | |
| − | |< | ||
| − | |||
| − | |||
| − | |||
| − | |||
| − | |||
| − | |||
| − | |||
| − | |||
| − | |||
| − | |||
| − | |||
| − | |||
| − | </ | ||
| − | | | ||
|- | |- | ||
|} | |} | ||
| + | </li> | ||
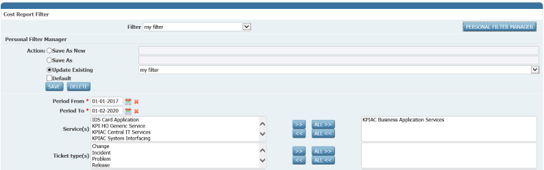
| + | <li> | ||
| + | On Filter tab, it is possible to manage personal filters selectable by user directly from report | ||
| + | |||
| + | [[File:reportFilter.png|centre|frame]] | ||
| + | </li> | ||
| + | </ol> | ||
| + | |||
| + | ==== Add report on itmSUITE® menu ==== | ||
| + | After report instance has been created on '''''Report Management''''', it needs to add a report entry in itmSUITE® menu. | ||
| − | + | [[File:reportMenu.png|centre|frame]] | |
| − | + | Report menu entry is configurable on the '''''General > Company > Main Navigation Menu''''', under the <u>''Not Used/Reporting''</u> section.<br/> | |
| − | - | + | '''Important:''' ''administrator'' re-login is required in order user can drag and drop new report entry from <u>''Not Used/Reporting''</u> section to any <u>''Main Navigation Menu''</u> section.<br/> |
| + | Finally report can be run in new itmSUITE® menu entry by users that have visibility grants. | ||
Versione attuale delle 15:18, 18 giu 2018
REP is an optional itmSUITE® module that defines functionality to manage and excute reports created by Eclipse BIRT Designer tool.
It allows to load one or more report templates (BIRT.rptdesign file) and to create and to execute report instances through the BIRT Viewer integrated on itmSUITE®.
Indice
BIRT Architecture
BIRT (Business Intelligence Reporting Tool) is an open source tool installed as Eclipse IDE plug-in for report developing. It has origin from collaboration between Actuate (along with IBM) and Eclipse.org open source community.
BIRT is a Java based tool that allows to extract data from many data source types for report generation in several output format (pdf, xlsx, docx, etc.).

BIRT architecture includes two main components:
- Report Designer: a UI component to create report template (.rptdesign file)
- Report Engine: runtime component for report rendering
The Design Engine generates a .rptdesign file (in XML format) structured according to configurations applied by user (by BIRT Designer) and the Report Engine, through BIRT Viewer, parse and renders it as report in HTML,or other, format.
BIRT Report on itmSUITE®
In itmSUITE®, the steps required to upload and execute BIRT report previously created through the BIRT Designer are following:
- Data source configuration
- Load report template (.rptdesign file)
- Create a report instance
- Add report on menu and execute it
Data Source Configuration
In itmSUITE®, BIRT report data can be extracted only from data sources connected to database. Data Source settings are accessible on the General > Company > Report Engine > Data Source menu.

Data source creation steps:
- Click on Add New button
- Fill following fields (* mandatory):
| Field Name | Description | Example Value |
|---|---|---|
| Name* | Logic data source item name | "Sample DB" |
| Description | Data source item description | "Sample data source" |
| Company* | Company to which data source item is assigned | "Sample Company" |
| Status* | Configurable Active/Inactive statuses | "Active" |
| Type* | Driver type used to connect to data source | "JDBC" |
| Data Driver* | Driver used to connect to data source | "MSSQL" |
| DB Server* | URL (or IP) of data source server | "192.168.10.5" |
| Port* | Connection data source port | "1433" |
| DB Name* | Database name to which data source item refers | "PMSM_SAMPLE_DB" |
| Username* | Username used to connect to database | - |
| Password* | Password used to connect to database | - |
- Click on Check And Save button to check database connection and to save data source settings
Load report template
Report template (.rptdesign) file defines the report structure in a well-formed XML document. In itmSUITE®, a report template can be associated to more report instances. Report template configuration is accessible on the General > Company > Report Engine > Report template menu.

The report template creation requires following steps:
- Click on Add New button
- Fill following fields on General tab:
| Field Name | Description | Example Value |
|---|---|---|
| Name* | Logic report template name | "Sample Report Template" |
| Description | Report template description | "A report tamplate as sample" |
| Status* | Configurable Active/Inactive statuses | "Active" |
| BIRT Report Template* | Load .rptdesign file | "Sample_Report_Template" |
- Fill the following fields on Data source tab:
| Field Name | Description | Example Value |
|---|---|---|
| Data source* | Data source imported from .rptdesign file | "PMSM_DB_TEST" |
| Mapped on | itmSUITE® data source item to which report template can refers for data extraction. If it is empty, data source defined in .rptdesign file is used | "PMSM DB Test" |
| Type* | Connection type to data source (always JDBC) | "JDBC" |
- Click on Save button to save report template settings
Create Report Instance
Report instance defines a BIRT report that can refer to only a report template and can be launched directly from itmSUITE® menu. A report instance is configurable on the General > Company > Report Engine > Report Management menu

The report instance creation requires following steps:
- Click on Add New button
- Fill following fields on General tab:
| Field Name | Description | Example Value |
|---|---|---|
| Name* | Report name | "Sample Report" |
| Description | Report description | "A sample report" |
| Status* | Configurable Active/Inactive statuses. If Inactive report cannot be shown on itmSUITE® menu | "Active" |
| Template* | Report template name to which report instance refers | "Sample_Report_Template" |
- Check that all report parameters are visible on Parameters tab:

- On Filter Designer tab, it is possible to customize a report launcher box (at default it contains the same parameters defined on report template):
- Hide/show report parameters
- Add/delete parameters sections
- Edit each report parameter item (read-only,label editing, mandatory, etc.)
- Add (as drag&drop ) Output field to extract report in several format (html, word, excel, pdf, ppt)
- Add (as drag&drop) Open Report in New Window check box to visualize report ouput on a new tab
- On Assignments tab, set report visibility grants on itmSUITE® menu
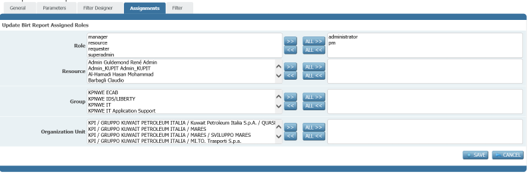
by following filter fields:
Filter Name Description Role it limits visibility to users that belong to following roles: superadmin, administrator, manager, pm, resource, requester. It works also as prefilter for Resource filter Resource it limits visibility to selected resources Group it limits visibility to members of selected groups Organization unit it limits visibility to resources that belong to selected organization units -
On Filter tab, it is possible to manage personal filters selectable by user directly from report

It is possible to see a report launcher preview by clicking on Preview button


After report instance has been created on Report Management, it needs to add a report entry in itmSUITE® menu.

Report menu entry is configurable on the General > Company > Main Navigation Menu, under the Not Used/Reporting section.
Important: administrator re-login is required in order user can drag and drop new report entry from Not Used/Reporting section to any Main Navigation Menu section.
Finally report can be run in new itmSUITE® menu entry by users that have visibility grants.